Maison AI ユーザーガイド
登録とログイン
Maison AIをご利用いただくためには、ユーザーアカウントの作成とログインが必要になります。
この項では、アカウントの作成方法および、ログインにまつわるガイドを提供します。
When using MaisonAI for the first time (invited to a workspace)
If you already have an account
Inviting workspaces
On the workspace selection screen, the workspace you've been invited to will be displayed in the "Invited" column.

Enter the name you want to use for the workspace

If you don’t have an account yet
Create an account
Enter your email address to create a new account

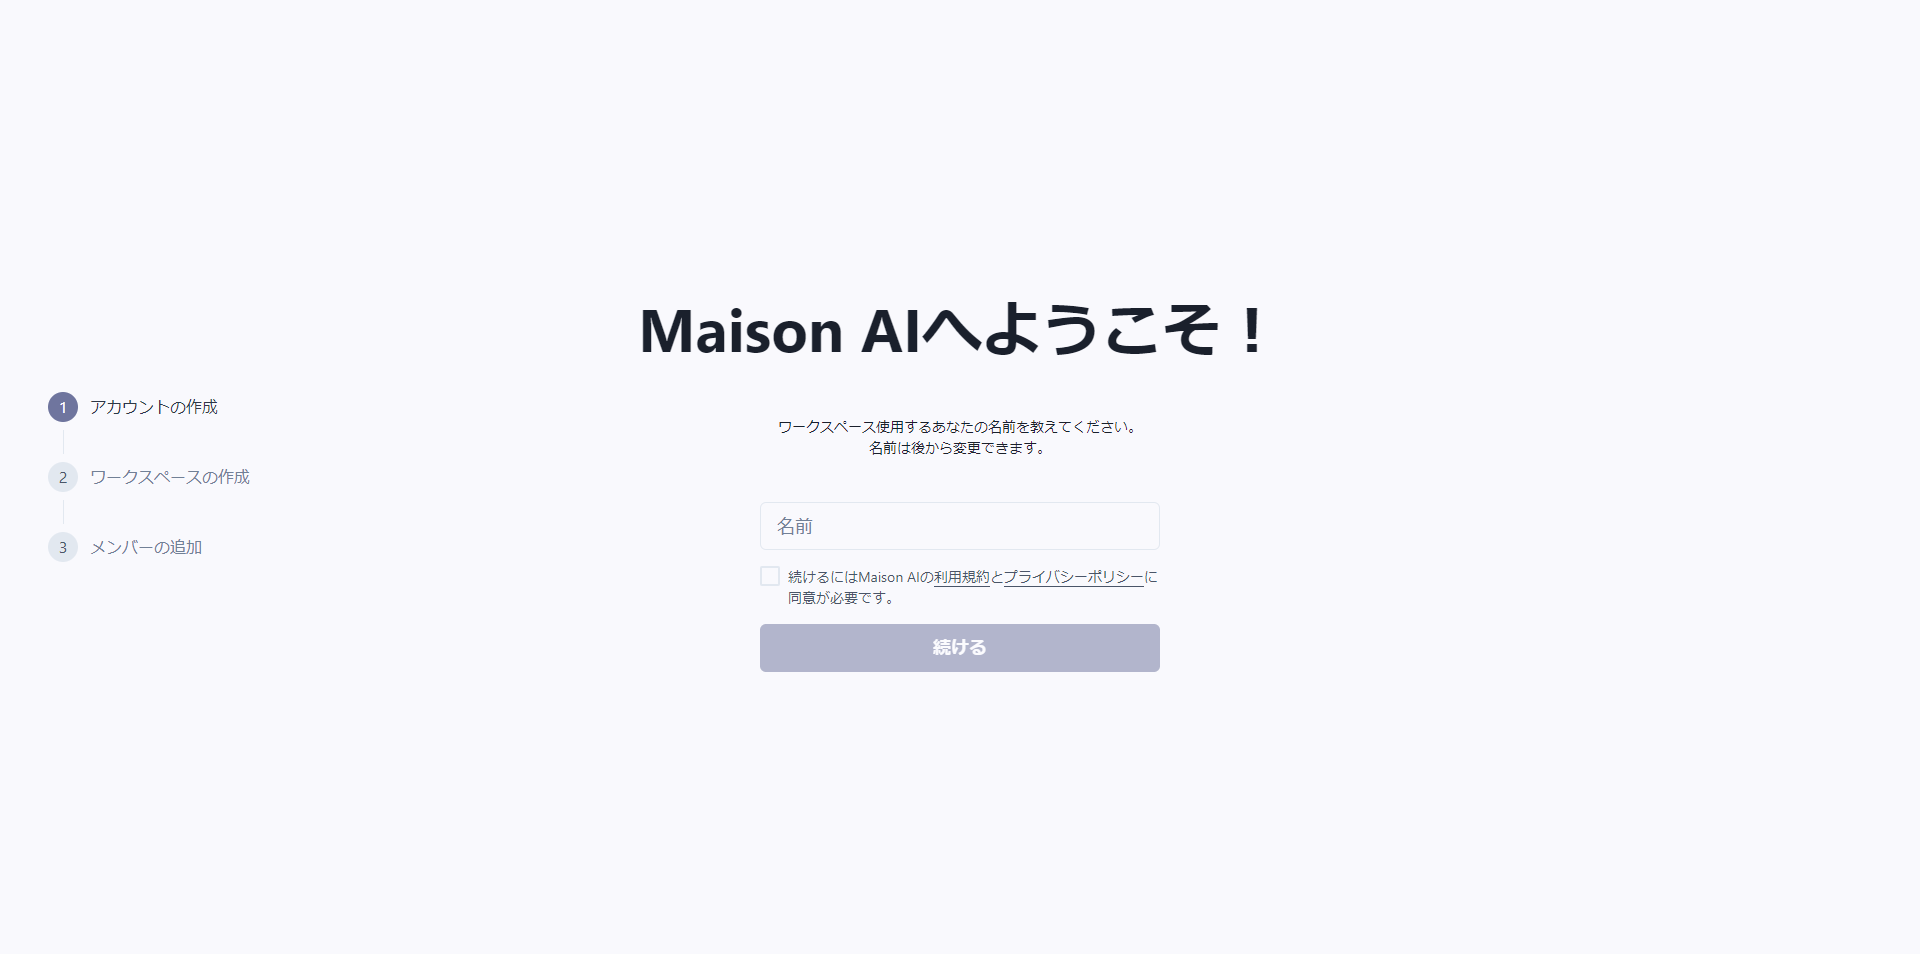
If you are successfully logged in for the first time, the following screen will be displayed.
Enter a name for the workspace.
The name you choose here can be changed later.
For second and subsequent logins
Select a workspace

The above screen will be displayed the second time you log in or later.
*This will not be displayed the first time you log in.
Participating
A list of workspaces that you can join is displayed.
Invitation
This will display a list of workspaces you're currently invited to.
If you don't see the workspace you want to join, you can get an invite from someone who's already in it to join your account.
ワークスペース
Maison AIは、チームでAIを共同利用するためのワークスペースを提供しています。履歴やエージェントなどの機能をチームで共有することで、AIの活用を促進します。また、支払いやユーザーの追加などの管理業務は一元管理され、メンバーはAIの利用に専念できます。
クレジット機能
概要
Maison AIでは、サービス利用料を「クレジット」として管理しています。クレジットはAIによる文章・画像生成などに必要な「ポイント」のようなもので、毎月一定数が付与されます。ユーザーは付与されたクレジットの範囲内でAI生成を利用できます。クレジット制により、月内でどれだけAIを利用できるかを常に把握でき、計画的に活用可能です。
付与されるクレジット数は契約によって異なります。
-
ベーシックプランをご利用の方: ワークスペースオーナー宛にメールでご案内をお送りしておりますので、ご確認ください。
- エンタープライズプランをご利用の方: 窓口担当者様宛にメールでご案内をお送りしておりますので、ご確認ください。
クレジットの利用方法
-
毎月のクレジット付与
毎月初めに所定のクレジット数がワークスペースへ付与されます。付与されたクレジットは当月内で自由に利用できます。 前月の未使用クレジットは繰り越しされないため、その月に付与されたクレジット枠内でご利用ください。
-
クレジット消費の仕組み
AI生成を1回使用するたびにクレジットを消費します。文章生成や画像生成などAIモデルごとに消費量が異なり、より高性能なAIモデルほど多くのクレジットが必要です。
-
残高の確認
管理者権限を持つユーザーは、Maison AIのワークスペース画面でいつでもクレジット残高を確認できます。「あと何回くらい生成できるか」を把握できるため、計画的に利用できます。
詳細はこちらからご確認下さい:ワークスペースの設定画面
支払い
-
支払いとクレジット付与
毎月1日に支払いが行われ、クレジットがリセットされます。
-
メンバーの追加・削除
新しいメンバーをワークスペースに追加すると、追加日から月末までの料金が日割りで翌月に請求されます。 メンバーの削除があった場合は日割りの返金はありません。
-
ワークスペース解約
月の途中で解約手続きを行っても、その月の残り期間の料金は返金されません。解約は翌月から有効となり、当月末日までは引き続きサービスを利用できます。
契約やクレジットに関してお困りのこと、ご不明な点がある場合はお気軽にお問い合わせ下さい。
Workspace setup and registration
overview
This page explains the [Workspace Settings].
[Workspace Settings] is only visible to users with Owner/Administrator privileges on the Basic plan.
What is workspace registration?
After the trial period ends, you will need to register your credit card and make a paid registration to use MaisonAI's workspace.
Please see the plan page for details on fees and plans. Only users with owner privileges can register/cancel.
Details of each permission can be found on the Account Permissions page.
Register your workspace
This can be done by going to [Workspace Settings] → [Start Full Registration].
*Only users with owner privileges will see the "Start registration" button.
The cost of this registration varies depending on the number of members participating in the workspace. Please remove any members you do not need in advance.

Adding/removing individual members
After you register your workspace, the cost of adding members will be calculated on a pro rata basis. There is no cost when you invite someone, but it is charged when they join.
Both owners and administrators can add members, but only the owner can view payment history. Administrators should make adjustments and add users to avoid unexpected charges.
There are no pro-rata refunds for removals, but if a removed member rejoins before their renewal date there will be no additional charge.
For instructions on how to add/remove members, please see the Managing Members (Add/Remove) page.
Rename a workspace
Users with Owner privileges can change the workspace name in the field below.

Create a new workspace
Only registered users with owner privileges can create new workspaces.
There will be an additional fee for the new workspace.
If you are interested, please contact us .Cancellation and changing card information
overview
This page explains how to cancel or change your credit card information in Workspace Settings.
Cancellation and changes to credit card information can only be made by users with Owner privileges for the Basic Plan.
Cancel a workspace
You can do this from Workspace Settings → Cancel Workspace.

When you click [Cancel workspace], you will be redirected to the [Stripe history page], where you can select [Cancel plan].

Even after cancellation, you can still use the service until your next renewal date.
After cancellation, your workspace data (history, agents, etc.) will be stored for a certain period of time and then deleted.
Change your credit card details
- As an Owner, go to Workspace Settings.
- Click Check Payment History.

- Click Add Payment Method and enter your new card details.

- Make the new card the default.

Managing participating members (add/delete)
overview
On the Member Management Screen, you can see who is already in the workspace and who is in the process of being invited.
After you register, the price will vary depending on the number of members. Please adjust the number of members you do not need in advance.

To check the permissions of all participating members, or to delete members, or to delete invited members (cancel invitations), click the Members item on the right side of the home screen header.

① Narrow down the members
- You can narrow down your search by user name or role.
② Inviting members
- You can invite members to your workspace using the invite button.
- You can grant permissions when inviting someone.

- If you invite a user who has already used Maison AI (a user who has joined another workspace), they will be displayed in the member list rather than being invited.
- There will be a cost when an invited user joins your workspace.
③ Deleting a member
- Users with Admin/Owner permissions can remove other members from the workspace.
- Any user can remove other invited members from a workspace.
④ Change member permissions
- Users with admin /owner privileges can change the privileges of other members.
- Ownership cannot be changed.
Member management screen on smartphone
On the smartphone version, access the member management page from the left menu.

Account privileges
Maison AI has limited functionality depending on the account permissions you are given.
Restrictions on functions based on permissions
| page | overview | Owner | Administrator | General |
| Workspace Settings | Page access | ◯ | ◯ | Hidden |
| Workspace Settings | Renaming a workspace | ◯ | × | × |
| Workspace Settings | Check your usage | ◯ | ◯ | × |
| Workspace Settings | Check the contract details | ◯ | ◯ | × |
| Workspace Settings | Check your payment history/restart your payment | ◯ | × | × |
| Workspace Settings | Cancel a workspace | ◯ | × | × |
| Member List | Page access | ◯ | ◯ | ◯ |
| Member List | Change Permissions | ◯ | ◯ | × |
| Member List | invitation | ◯ | ◯ | × |
| Member List | Remove member | ◯ | ◯ | × |
| Member List | Cancel invitation | ◯ | ◯ | × |
| history | Title Change | ◯ | ◯ | Only your history |
| history | delete | ◯ | ◯ | Only your history |
| AI Agent Pro | Edit/Delete | × | × | × |
| AI Agents | Edit/Delete | ◯ | ◯ | Own agents only |
| AI templates | Edit/Delete | ◯ | ◯ | Only your own templates |
Changes to permissions
You can change it by selecting from the drop-down menu on the member list page .
* Only Administrator → General / General → Administrator. Owner authority cannot be changed.

ユーザー設定
MaisonAIのユーザー設定機能では、自分に最適な環境にカスタマイズできます。使用言語(日本語や英語)やAIモデル(GPT-3.5やGPT-4)を切り替えたり、ユーザー名を変更することが可能です。これらの設定は他のメンバーに影響を与えないので、自由に調整できます。
account settings
overview
Your account settings allow you to customize the experience that works best for you.
You can switch the language (Japanese or English), AI model (GPT-3.5 or GPT-4), and change your username.
Feel free to adjust these settings as they won't affect other members.
How to use
- Click on the account name in the left menu to go to the account editing screen.

① Change the icon
- You can set the icon image.
- By default it will be your initials.
② Change your account name
- You can change the account name.
③-④ Change your email address and password
- You can change the email address and password you use to log in.
- This will not be displayed if you created your account with Google Login.
⑤Changes in the text generation model
- The accuracy of text generation AI such as AI agents varies depending on the AI model used.
- "ChatGPT3.5" is set as the default.
⑥Change the image generation model
- The functionality and accuracy of image generation will vary depending on the AI model used.
- "Stable Diffusion XL" is set as the default.
Notes
- The upper limit varies depending on the AI model used.
- Please refer to the pricing page for the maximum limits for each model.
⑦Language
- MaisonAI can be switched to four languages. The following are supported:
- Japanese, English, Chinese (Traditional), Korean
Notes
- Even if you switch the language, if a prompt for an AI agent or other device specifies "Please output in Japanese," the AI's response will be in Japanese.
基本機能
MaisonAIの「基本機能」は、AIを直接操作する機能ではなく、プロンプトライブラリ、ホーム画面、履歴機能など、AIの使用を便利にする補助的な機能を指します。これにより、ユーザーは効率的に学習し、AIを効果的に活用できます。
Left Menu
overview
We will explain the left menu to access the basic functions of Maison AI.
How to use

①Select workspace
- The workspaces you are a part of are displayed.
- You can switch workspaces by selecting them.
②Each function
You will be redirected to each page.
The page you are currently viewing is highlighted.
- Get instant access to useful features such as home learning content, AI Agent Pro, and AI design templates.
- You can use the original ChatGPT without configuring AI chat behavior.
-
AI Agent Pro
You can use AI Agent Pro to chat immediately without any setup.
-
AI Agents
You can view the list of AI agents and use AI agents.
-
AI templates
You can view the template list and use the templates.
-
AI Design
You can use image generation AI.
-
Prompt Library
You can use AI functions set for specific purposes such as general purpose, fashion-specific, and image.
-
history
You can view the chat history.
③Workspace settings
④ Account settings
Home Screen
overview
You can access various functions from the workspace home screen.

Header

- At the top of the page is the header.
- By entering your question here, you can start a regular AI chat without an agent.
- Go to the member management page.
Learning Content

- You can watch the MaisonAI tutorial video.
- Click on a thumbnail that interests you in [Recommended Learning Content] and the video will begin playing.
AI Agent Pro

- We have prepared AI Agent Pro, which even first-time users can use easily.
- It can be used directly from the home screen, but unlike regular AI agents, it cannot be customized.
AI Design

- You can generate images.
- By clicking on each sample, you can start generating images similar to the sample, just like with AI Agent Pro.
history
overview
In [History], you can view your own history and that of other team members. This can help you get ideas for how to use AI, and by sharing your own usage with others, you can promote the use of AI within your team.
History list screen [Display]

How to use
①Text/Image Switching Tab
This tab switches between the following two displays:
- AI chat, AI agents, AI template generated text
- AI-designed images
②User switching tab
This tab allows you to switch between the following three displays:
- all
- View the history of all users.
- member
- View the history of members other than yourself.
- You cannot see history that members have set to "private."
- myself
- View your history.
③ Search
You can search not only the title of the history but also the content of the conversation.
④New chat from history template
You can now go to the template you used and start a new chat.
History list screen [Edit / Delete]
On the list screen, you can make various edits to your own history.
How to use
- Select [Edit] from the [...] icon. You can also [Delete] it.
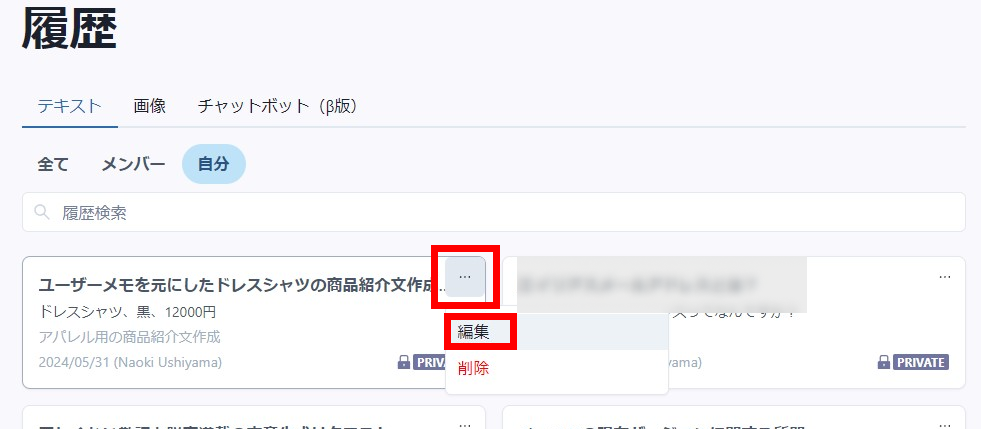
- You can set easy-to-understand titles for your history and change the scope of visibility.

History details screen
① Details of past history and resume chat
②Go to the template you used
You can also [Go to used template] from the details screen.

account settings
overview
Your account settings allow you to customize the experience that works best for you.
You can switch the language (Japanese or English), AI model (GPT-3.5 or GPT-4), and change your username.
Feel free to adjust these settings as they won't affect other members.
How to use
- Click on the account name in the left menu to go to the account editing screen.
① Change the icon
- You can set the icon image.
- By default it will be your initials.
② Change your account name
- You can change the account name.
③-④ Change your email address and password
- You can change the email address and password you use to log in.
- This will not be displayed if you created your account with Google Login.
⑤Changes in the text generation model
- The accuracy of text generation AI such as AI agents varies depending on the AI model used.
- "ChatGPT3.5" is set as the default.
⑥Change the image generation model
- The functionality and accuracy of image generation will vary depending on the AI model used.
- "Stable Diffusion XL" is set as the default.
Notes
- The upper limit varies depending on the AI model used.
- Please refer to the pricing page for the maximum limits for each model.
⑦Language
- MaisonAI can be switched to four languages. The following are supported:
- Japanese, English, Chinese (Traditional), Korean
Notes
- Even if you switch the language, if a prompt for an AI agent or other device specifies "Please output in Japanese," the AI's response will be in Japanese.
AIチャット
MaisonAIの「AIチャット」は、文章でAIと対話できる機能を提供します。ユーザーはこの機能を使って、自由にAIと対話したり、挙動を設定したAIにタスクを振ったり、アドバイスを受けたりすることができます。また、ニーズに合わせてAIの設定をカスタマイズすることもできます。
Basics about AI chat
Users can use AI agents and templates in combination with text generation AI technologies such as ChatGPT to engage in dialogue. The content generated here can be used to improve work efficiency and plan new businesses.
Specifically, you can elicit new ideas through question-and-answer format through dialogue with an AI agent, or use the template function to generate standardized answers.
Chat Basics
There are four types of chat
| AI templates | Chat according to the template you set |
| AI Agents | Chat with agents with detailed behavior settings |
| AI Chat | Chat freely with AI with no settings |
| Chats from history | Resume chats from your past history |
Selecting a Text AI Model
You can choose the text AI model to use in chat depending on the situation.- Standard model: ChatGPT 4o-mini
- The response time is fast, so you can chat without waiting.
- You can use it without worrying about the upper limit.
- High performance model: ChatGPT-4o
- It gives a more logical and human-like answer.
- There is a monthly usage limit per workspace.
Upper limit of text AI model
- Maximum number of characters that can be entered per question: 40,000 characters
- Maximum total number of characters per chat: Approximately 96,000 characters
How to use
- Go to Account Settings.
- Select [Model to use] > [Model name] .
- Press [Change].

AIモデル別 性能一覧
update 4.Feb.2026
Maison AIでは、用途に応じて複数のAIモデルを使い分けることで、作業の質と効率を大きく向上させることができます。
ここでは、各AIモデルの主要な性能指標(精度、処理速度、推奨用途など)を一覧でご確認いただけます。
AIテキスト生成モデル
モデル名称はMaison AIでの表記名となります。
| モデル名称 | 特徴 | 精度 | 速度 | 最大 文字数 |
外部サイト 参照 |
ファイル参照 | 画像 参照 |
コードインター プリター |
画像生成 | コスト |
| 標準: ChatGPT-4o | Open AIの汎用型モデル。複雑な指示に正確に対応し、品質とコストのバランスに優れ、日常業務に適している。 | 中 | 中速 | 115,200 | ○ | ○ | ○ | ○ | × | やや高額 |
| 標準: ChatGPT-4o-mini | Open AIの低コスト軽量モデル。高速処理で長文や多件リクエストに迅速かつ安定して対応。 | 低 | 高速 | 115,200 | ○ | ○ | ○ | ○ | × | 非常に低額 |
| 高速: GPT-5-mini | OpenAIの高速モデル。主にスピードとコストを重視する日常業務用。チャットの返信案作成など、それほど長い回答が不要な時に最適。 | 中 | 高速 | 360,000 | ○ | ○ | ○ | ○ | × | 非常に低額 |
| 標準: GPT-5 | OpenAIの汎用モデル。バランスの取れた推論。幅広いタスクで高品質。文章作成や要約など、日常業務での幅広い用途に。 | 高 | 中速 | 360,000 | × | ○ | ○ | ○ | × | やや高額 |
| 推論: GPT-5 | OpenAIの高性能推論モデル。専門的な分析や企画立案など、深い思考が必要な場面で活躍。複雑な意思決定支援に。 | 高 | 低速 | 360,000 | × | ○ | ○ | ○ | × | やや高額 |
| 高速: ChatGPT-o3-mini-high | Open AIの小型推論モデル。単発問題に対し高速かつ高精度な回答を生成するが、長文対話は苦手。 | 最高 | 中速 | 180,000 | ○ | ○ | × | × | × | やや低額 |
| 推論: ChatGPT-o1 | Open AIの大規模推論モデル。段階的な思考を行い数学・プログラミング等が得意、応答は遅くコストも高い。 | 最高 | 低速 | 180,000 | ○ | ○ | ○ | × | × | 非常に高額 |
| 推論: Claude-4-sonnet | Anthropicの高性能モデル。速度と精度のバランスに優れ、日常業務の効率化を強力にサポート。 | 最高 | 中速 | 180,000 | ○ | ○ | ○ | × | × | 非常に高額 |
| 推論: Claude-4.5-sonnet | Anthropicの最先端推論モデル。複雑なエージェント構築やコンピュータ操作タスクに特化しており、金融分析から予測分析まで対応。 | 最高 | 中速 | 180,000 | ○ | ○ | ○ | × | × | 非常に高額 |
| 高速: Gemini-2.0-Flash | Googleの大量テキスト処理向け高速モデル。会議記録や資料要約に迅速かつ低コストで対応。 | 低 | 高速 | 943,718 | ○ | ○ | ○ | × | × | 非常に低額 |
| 高速: Gemini-2.5-Flash |
Googleの高速モデル。速度とコスト効率を極め、リアルタイム対話や大規模なデータ処理に最適。
|
高速 | 943,718 | ○ | ○ | ○ | × | × | 低額 | |
| 推論: Gemini-2.5-Pro | Googleの思考と推論の強化モデル。マルチモーダル理解、高度なコーディングなど。 | 最高 | 中速 | 943,718 | ○ | ○ | ○ | × | × | やや高額 |
| 高速:Gemini-3.0-Flash | Gemini-3.0の高速、価格を抑えたモデル。マルチモーダル理解、複雑なデータ分析など。 | 最高 | 高速 | 943,718 | ○ | ○ | ○ | × | × | 高額 |
| 推論:Gemini-3.0-pro | 思考と推論をさらに深めたGoogleの最新モデル。マルチモーダル理解、複雑なデータ分析など。 | 最高 | 高速 | 943,718 | ○ | ○ | ○ | × | × | やや高額 |
| チャット画像生成: Gemini-2.5-Flash | Googleのマルチモーダル生成モデル。優れた速度で高度にテキストや画像を生成できるモデル。 | 最高 | 高速 | 29,491 | × | ○ | ○ | × | ○ | やや高額 |
※最大文字数とは
1回の会話の中での添付ファイルの文字数とチャットの合計文字数の上限となります。AIエージェント/テンプレートに添付したファイルの文字数もカウントされます。
※推論モデル
高品質な回答を生成するため、時間がかかる場合があります。
※チャット画像生成: Gemini-2.5-Flash
AIエージェント、AIテンプレートは対応しておりませんので、他のモデルをご利用ください。
コードインタープリター(ベータ版)
対応モデル:高速: ChatGPT-4o-mini / 高性能: ChatGPT-4o
AIモデル別 対応ファイル一覧
https://maisonai.io/blogs/guidebook/supported-formats
AIサーチモデル
| モデル名称 | 特徴 | 外部参照 | ファイル解析 | 画像解析 | 速度 | 精度 | コスト | 文字数 |
| 高性能: Sonar Pro | PerplexityAIのユーザーの質問を解釈し、信頼性の高い情報源を優先した検索結果を基に高精度な回答を生成する AIモデル。 | ○ | - | - | 高速 | 最高 | 高 | 300,000文字 |
AIデザイン生成モデル
| モデル名称 | サービス名 | プロンプト対応力 | 生成後の一部修正 | 生成後の全体修正 | 画像のアップロード | クレジット消費量 |
| 標準: SDXL1.0 | Stable Diffusion | 標準 | 不可 | 可能。修正度合を調整不可 | 不可 | 非常に低額 |
| 高性能: 3.5 Large | Stable Diffusion | 高精度 | 一部修正が可能 | 可能。修正度合を調整可能 | 可能 | やや高額 |
| 高性能: Flux-Lora(最新) | fal | 高精度 | 不可 | 可能。修正度合を調整不可 | 可能 | やや高額 |
| 着せ付け: Try-On(最新) | fal | ー | ー | ー | 必須 | 非常に高額 |
| 高性能:Seedream-4 | Bytedance | 高精度 | 高精度 | 高精度 | 可能(10枚まで) | 高額 |
同じプロンプトで生成した比較

※比較のため全て1024×1024で生成。Seedanceについては4Kサイズを選択して生成するともっと高解像度になります。
プロンプト
[画像全体:女性モデルにフォーカスした全身画像、動きとドラマを強調したスタイル、シンプルで力強いファッション]
[ジャケット:インディゴブルー、デニム素材、ユニークなデザイン、膨らみのある袖、ウエストに広がるフレア]
[スカート:インディゴブルー、ひざ上の長さの丈、デニム素材、現代的、柔らかい印象]
[髪型:ミディアムボブ、ウェーブ、エレガント]
[背景:暗い、シンプル、ドラマチック]
着せ付け:Try -On
こちらのモデルは、着用させたいモデル画像と、着用させたい衣装の画像の2枚をアップロードするだけで、試着したような画像を生成することができるモデルです

生成結果
使い方はこちらから 着せ付け:Try -On
Purpose of AI Agents and AI Templates
overview
This page compares user-customizable AI agents and AI templates, explaining the purpose and mechanisms of each.
For information on AI Agent Pro, which cannot be customized by users, please see here. AI Agent Pro

Purpose of AI agents and AI templates
①AI Agent
You can set the AI's behavior in advance before using it.
Settings include the AI's professional background, personality and tone of voice, accumulated knowledge, and the format of the text to be output.
This makes it possible to recreate an "AI expert" that is knowledgeable in a specified field and behaves as specified.
AI agents are good at a variety of tasks, from simple to abstract and expert advice.
example:
This is an AI agent that creates product descriptions from bullet points.
The purpose and output format are specified on the AI agent setting screen.

②AI Templates
The first sentence you send to the AI is set as a "template" and used.
When starting a chat, users can fill in the blanks or customize the text.
This allows you to send complete information to the AI, making it easier to get targeted answers.
This is great for simple tasks where you want repetitive or standard output.
example:
This is an AI template that creates a catchy slogan for a product.

AI agent/AI template list screen
overview
Since the list screens of AI agents and AI templates have many items in common, we will explain the AI agent list screen in detail here.
On the list screen, you can easily select the agent you want to use and access the chat screen. Various functions are provided to help you smoothly find the agent you are looking for from the many agents available.
About each function in the list

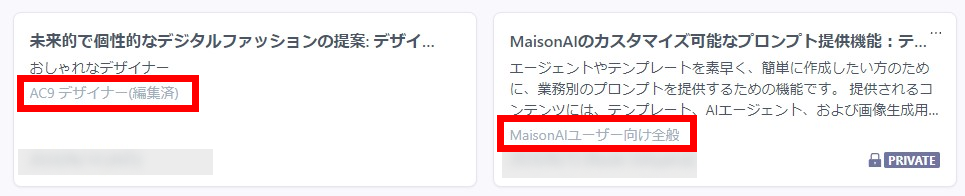
① Team/Private tab
You can switch agents depending on the scope of visibility.
Agents on the team can use it too, and chat history is shared across the team.
Since private agents can only be used by you, you can use them for tasks that are specific to your work or that do not need to be shown to others.
You can change the visibility of your chat after it has been posted.
How to use
- You can switch between them by clicking the tabs.
② Search
You can search by agent name or text in the description.
How to use
- Enter the word you want to search in the search box.
- AND searches are also possible.
- Search results are updated in real time.
③ Three dots
Clicking the [...] icon allows you to change the settings of that agent on the list screen.
How to use
- Click the [...] icon.
- Templates that users have created themselves or have administrator privileges or higher can be edited or deleted.

- If you do not have permission to edit or delete, go to the details screen as shown below.

④ Favorites
You can register frequently used agents as favorites.
The Favorites feature is not shared with other members, so each user can favorite things individually.
How to use
- Click the [★] icon to the right of the agent you want to make your favorite.
- The selected agent will now be displayed in [Favorites] at the top of the list screen.

⑤Add
Add a new agent. Clicking this will take you to the agent settings screen.
For details, please see the AI Agent/AI Template settings screen here.
AI agent/AI template settings screen
overview
This section explains the settings screens for the AI agent and AI template.
As with the list screen, there are common items between AI agents and AI templates in the settings screen. In addition to these common items, we will also explain the unique items that each has.
Common items

Common 1) Title, description, and icon image
The settings you make here will be displayed on the list screen.
title
- The name of the agent. It does not affect the AI generation results.
Description
- This is a description of the agent. It does not affect the AI generation.
Icon Image
- You can attach an image to your AI agent.
- Please upload a square image.
- The default is no image.
Common 2. File upload
- We will answer based on the file information uploaded here.
- You can attach PDF, CSV, Word, and text files.
- The character limit varies depending on the GPT model you use.
- Accuracy will improve if you write "Please answer according to the attached file" in the agent settings.
Common 3) Scope of disclosure
team
- Publish the AI agent to members of your workspace.
- Chats created in a team will have their history visible to the team.
Private
- Your AI agent will not be visible to other members of the workspace.
- Any chats created privately will have their history visible only privately.
You can also change the visibility of your chat history after the chat.
Common ④Create Button
- Create an agent with the configured settings.
- The user or administrator who created it can edit the contents later.
AI Agent Settings

What kind of AI agent is it?
Set the behavior of the AI agent. For example, there are the following items.
- Areas of expertise and prior knowledge:
- Set specific areas of expertise and prerequisite knowledge that the AI agent should have, such as "marketing expert," "technical support specialist," "knowledge of SEO," and "customer support process."
- Personality and tone:
- Customize the personality and tone of your AI agent. For example, you can set it to be "friendly" or "formal."
- Output format settings:
- Set the format and style of the text generated by the agent, for example "bullet points" or "detailed description".
First message
Enter a message to start the chat, giving clear instructions to users on how to start the chat and what the AI agent can answer.
Example of message to set:
- "In this chat you can ask questions about product information."
- "This AI agent will provide advice on marketing strategies."
These messages provide users with a quick guide to get the information they need.
AI template settings

Templates
With AI templates, users can always get answers with a consistent level of accuracy by rewriting or filling in parts of pre-set template sentences.
When creating a template, it is a good idea to consider the following:
① Output instructions to AI:
Clearly define the output you want from the AI. For example, enter specific requests such as the following:
- For example: Please briefly explain the features of your product.
- Example: Please respond appropriately to the inquiry.
② Input field for users:
To use AI templates effectively, it’s a good idea to provide clear input fields for users so they know what to fill in. We recommend including specific instructions in your template, such as:
- Example: "Enter product name here: _____"
- Example: "Please enter your inquiry: _____"
AIサーチ
AIサーチとは
AIサーチは、ウェブ上の最新の信頼性の高い情報源を基に、AIが回答を生成する機能です。
主な特長
- 根拠の明示: 回答文中に情報源を番号で表示し、参照元のリンクを提供
- 専用AIモデル: Perplexity AI / Sonar proを使用
- 独立した設定: アカウント設定でAIモデルを変更しても、AIサーチは常にSonar proで動作
できること
- 効率的な情報収集
- 1回の指示で複数の信頼性の高い情報源から、まとめて情報を取得できます
- 視覚的な整理
- 通常のチャットより見やすく整理された形で情報が表示されるため、理解しやすくなります
- 画像表示
- 関連する画像が表示され、イメージボードのように活用できます
- 深掘り質問の提案
- パーソナライズされた追加質問が自動提案され、スムーズな情報収集が可能です
活用シーン
🚀 新規プロジェクト開始時
-
- 複数の専門的な情報源から関連情報を効率的に集約
- プロジェクトの検討を迅速に開始
📈 市場・競合動向の把握
-
- 最新情報をタイムリーに収集・整理
- 競争力維持・強化のための洞察を獲得
✅ 情報発信のファクトチェック
-
- 複数の信頼できる情報源を参照
- 正確性が求められる情報発信をサポート
🔧 問題解決時の情報収集
-
- 予期せぬ問題発生時に技術情報や事例を迅速に提示
- 早期対応を実現
📚 専門知識の習得
-
- 専門的な情報源へのアクセスを容易に
- 新たな知見の獲得をサポート
使い方
(1) AIサーチにアクセス
-
- レフトメニューの「AIサーチ」をクリック
(2)質問を入力
-
- リサーチしたい内容を入力欄に記入
(3)追加調査(必要に応じて)
-
- 自分で追加質問を入力
- または提案された質問から選択
(4)履歴の確認
-
-
「AIサーチ」メニューから過去の検索履歴を確認
-

AIサーチ機能を活用することで、信頼性の高い情報を効率的に収集し、業務の質とスピードを向上させることができます。ぜひ日常の情報収集にお役立てください。
コードインタープリター(ベータ版)[GPT-4o/GPT-4o mini]
コードインタープリター(ベータ版)とは
AIチャット画面内で直接Pythonコードを実行できる強力な機能です。
✅ 対応AIモデル
- 標準: ChatGPT-4o
- 標準: ChatGPT-4o-mini
🎯 できること
- エクセルファイルなどのデータを読み込み
- 高度な解析・分析を実行
- 結果をファイル形式/画像形式で出力・ダウンロード
ご利用ガイド
1. AIチャットを開始
「AIチャット」を選択し、インフォメーションをクリック
(AIエージェント/AIテンプレートでも選択可)
2. 機能を有効化
「コードインタープリター(ベータ版)」のスライダーを「ON」に切り替え

3. ファイルをアップロード
画面右下からアップロードボタンをクリックし、分析したいファイルを選択
4. 分析内容を指示
チャット欄に「このデータの売上推移を分析して」など、具体的な指示を入力

5. 結果をダウンロード
「エクセル形式で書き出して」「グラフをPNG形式で出力して」など、お好みの形式で出力を指示

対応ファイル形式
データファイル
- .xlsx(エクセル)
- .csv(CSV)
- .pdf(PDF)
- .txt(テキスト)
- .docx(Word)
- .pptx(PowerPoint)
画像ファイル
- .png
- .jpg
- .webp
- .gif
⚠️ 注意事項とトラブル対処法
エラーが発生した場合
ネットワークエラーやファイル生成リンクの不備が発生することがあります。
→ 再度お試しください
セッション切れ対策
- アップロードしたファイルは手元に保存しておく
- 作業中断時は、生成されたファイルをダウンロード保存
- 再アップロードが必要になる場合があります
日本語の文字化け対策
グラフ生成時に日本語が文字化けすることがあります。
解決方法:
- 英語に翻訳してからアップロード
- コードインタープリターで日本語→英語翻訳後、エクセル出力
(一部日本語が残る場合があります)
職業別活用例
| 職業 | 活用例 |
| マーケター | - 広告のクリック率(CTR)やコンバージョン率の分析 - Google Analyticsデータの解析 - SNSの投稿パフォーマンスをグラフで可視化 |
| 営業担当 | - 顧客データから売上推移を可視化 - 成約率の分析や営業成績のレポート作成 - 見込み客リストのスコアリング |
| 商品企画 / MD(マーチャンダイザー) | - 商品ごとの販売実績グラフ化 - 季節別の売上トレンド分析 |
| 人事 / HR | - 従業員の勤怠データ分析 - 離職率や採用コストの推移を可視化 - 評価・給与分布の分析 |
| 経営者 / 経営企画 | - 売上・利益の月次推移や前年比較 - 会議用の資料のグラフ作成 |
| Webディレクター / UX担当 | - ユーザー行動ログの分析(ページ遷移、離脱率など) - A/Bテスト結果の解析 - Webフォーム改善のための入力エラー分析 |
AI Agent Pro
overview
AI Agent Pro is an AI agent that does not require any initial setup and can be tried right from the home screen. Even first-time users can easily use it.
However, unlike normal AI agents, users cannot customize the AI settings.
You can get advice from expert agents in a wide range of professions.

How to use
- AI Agent Pro can be easily accessed from the home screen.

- You can also see a list of agents by accessing them from the left menu.

- Have a conversation with professional AI agents in each field.

Image analysis
overview
Image analysis can be performed on the chat screen. This allows AI to analyze the characteristics of uploaded images.
Specific uses will be introduced as "use cases" later in this article.
How to use
- On the chat screen, select the image from the paperclip icon.

- After selecting the image, the analysis is performed along with the text that instructs it. Note that multiple images can be analyzed at the same time.

Notes
- Image analysis supports the following file extensions: PNG, JPG, JPEG, WebP, GIF.
- Image file size is limited to 20MB
Use Cases
We will introduce some use cases that may be useful for image analysis.
① Analyze images and create product descriptions
The AI writes the introduction by analyzing the characteristics of the image and specifying the length of the text etc. in the instructions.

② Analyze the image and create a prompt for image generation
From image analysis, you can also use text descriptions of images to generate similar images. Below, we instruct the AI to analyze by category, such as [structure], [shape], etc.

Image generation results

3) Analyze handwritten notes and diagrams
You can also photograph and analyze handwritten notes and diagrams, and use AI to transcribe them and analyze the diagrams.

File upload
overview
Users can upload files such as CSV and Excel on the chat screen, making it easy to analyze constantly changing data such as sales and reports.
How to use
Model Switching
File uploads can be performed using both GPT-4o mini and GPT-4o.
There are differences in accuracy, so choose which model to use based on your needs.
Uploading via chat screen
On the chat screen, you can select the file you want to upload using the [+] button next to the send button.

You can also select multiple files.
Send it to chat with instructions on how to analyze it.

Available file formats
The supported file extensions are as follows:
| Available file formats | Extension |
| CSV file | .csv |
| Text files | .TXT |
| PDF file | |
| Excel file | .xlsx |
| Word File | .docx |
| Image files | .jpg, .jpeg, .png, webp, .gif |
For more information about image analysis, please see below.
Link: Image Analysis
Upper limit
The upper limit for each model is as follows. Both GPT-4o and 4o mini can handle the same number of characters.
Please note that this limit includes not only the number of files uploaded, but also the cumulative number of chat characters. If you reach the limit, please start a new chat and continue using the service.
| Model | Token Limit | Character limit |
| ChatGPT-4o mini | 128,000 Tokens | Approximately 96,000 characters |
| ChatGPT-4o | 128,000 Tokens | Approximately 96,000 characters |
Use Cases
It can refer to multiple CSV files to suggest appropriate actions and strategies.
As a specific example, we refer to product inventory and sales data to ask which products need promotion and what promotional techniques would be effective.

The AI agent can analyze these CSVs and make suggestions, including promotional methods.

It is also possible to perform analysis with various combinations, such as images and CSV files.
External site reference
overview
You can now access Google searches and specific websites directly from the chat screen, allowing you to get the latest news and information on the Internet, as well as summaries of websites you specify.

External site references will always use GPT-3.5 regardless of user settings.
Also, please note that when retrieving website content, tokens will be consumed according to the amount of text .
How to use
External reference ON
Every chat screen has a switch to turn external references on or off.
If you want to use external references, turn it ON before starting a conversation.
Once the conversation has started, you will no longer be able to switch it on/off.

If the user does not specify a URL
MaisonAI will perform a Google search to provide you with an answer.
If you simply ask a question, the AI may answer without searching the Internet. If you want it to search and answer your question, try the following phrases:
- Words related to real-time and internet, such as "latest" and "online"
- Instructions such as "Please search on Google and then answer"
Also, if you want to clarify which website you actually looked at when answering a question, it's a good idea to include phrases like the following.
- Instructions such as "Please provide the URL of the quote"

When the user specifies a URL
The AI can refer to reference URLs by pasting them into the conversation.

remarks
You can determine whether AI is using the external site reference function by looking at the display below.
- (Looking up information...)

- If this display is not present, the AI will answer from its own database rather than from an external site.
チャットボット
概要
Maison AIで作成したAIエージェントを、ワークスペース外のユーザーにも公開する事ができます。
この機能を利用することで、AIエージェントを、チャットボットとしてウェブサイトに設置できます。URLを共有したり、ウェブサイトに埋め込むだけで、簡単にチャットボットを公開できます。
作成したAIエージェントは、公開範囲を設定することで、様々なユーザーに共有できます。
| 公開範囲 | 説明 | 用途例 |
| 一般公開 | Maison AI の利用の有無に関わらずインターネット上の誰でもアクセス可能 | 製品ページの問い合わせ対応、 サービス利用ガイド |
| パスワード付き | Maison AI の利用の有無に関わらずパスワードを知っている人のみがアクセス可能。 | 社内FAQ、 部署専用チャットボット、 特定顧客との情報共有 |
使い方
編集画面
ここでは、AIエージェントを外部公開する手順を説明します。
[...]から[編集]をクリックします。もしくは、[新規作成]をクリックします。

1. 公開範囲
- [チャットボット(ワークスペース外に公開)] に変更します。
- こうすることで、ワークスペースの外にいるユーザーも、AIエージェントをチャットボットとして利用できるようになります。
2. 使用するAIモデル
- GPT-4o mini や Gemini1.5 Flash など、複数のAIモデルから選択できます。
- より高性能なモデルは、多くの使用量を必要とするためご注意ください。
3. 月間利用上限
- 外部のユーザーがこのチャットボットを利用できる月間利用上限を設定します。上限に達すると、チャットボットは利用できなくなります。
- デフォルトでは100,000トークンに設定されており、これは約75,000文字分のテキストに相当します。
- 上限に達した場合は、編集画面から上限を再設定する必要があります。
- ワークスペース全体で使用できる上限は契約によって異なります。ワークスペースのオーナーまたは管理者にご確認ください。
共有設定画面
ここでは、チャットボットの外部ユーザーへの公開方法を設定します。
[...]から[共有設定]をクリックします。

1. 共有(埋め込み用コード)
-
ボタン+ミニウィンドウ: ウェブページの右下にチャットボットを埋め込むことができます。提供者側はページ内のHTMLを編集する必要があります。
※この機能は現在開発中です。近日中にリリース予定です。 -
フルウィンドウ: ユーザーに直接URLを教えることで、フルウィンドウでアクセスできるようにします。

2. チャットボット利用パスワード
-
ON にすると、パスワードを設定できます。パスワードを知っているユーザーだけがチャットボットを利用できるようになります。
- パスワードは6文字以上の英数字で設定してください。
- セキュリティ対策として、パスワードを設定済みの場合、共有設定を閉じて再び開いても、設定したパスワードが画面上に表示されない仕様になっています。
- パスワードを忘れた場合は、再設定を行ってください。
3. 利用状況の確認
- 使用回数: 何人に利用されたかを把握できます。
- 使用量: どれくらいの量利用されているかを確認できます。設定した月間利用上限を超えそうであれば、[編集]から上限を変更してください。
履歴画面
- チャットボットを利用したユーザーは、チャット終了後に履歴を見ることはできません。
- チャットボットの履歴は、AIエージェントを作成したワークスペースに保存され、ワークスペース内のユーザーであれば誰でも閲覧できます。
- なお、チャットボットを利用したユーザーは匿名(undefined)として表示されます。
⚠️注意事項
- 外部公開したチャットボットの使用量は、作成したワークスペースの使用量としてカウントされます。ワークスペース管理者は、チャットボット自体の上限を確認するとともに、ワークスペース全体での使用量にも注意してください。
- ワークスペース使用量の詳細は、管理者以上のユーザーでワークスペース設定画面(参考:ワークスペース設定と本登録)から確認してください。
AIデザイン
MaisonAIの「AIデザイン」は、テキストから画像を生成する機能です。ユーザーは好きなキーワードを日本語で入力し、画像のスタイル(絵画調、写実的)や比率などを指定して、理想的な画像を作成することができます。
AIデザインの基本
概要
AIデザインでは、キーワードや文章のプロンプトから画像を生成する事ができます。
このページでは、AIデザインの画面や操作方法について解説します。
デモ動画
基本的な使い方を動画でご覧頂けます。
使い方(生成開始)
プロンプト入力欄
メイン画面ではプロンプト入力欄のみ表示される仕様になりました。
入力欄をクリックする事で内容の編集が可能です。

プロンプト調整画面
詳細設定は、以下のボタンを押すことで右側にパネルが出てくるので、その中で行います。
パネル外の空白・Xボタンを押すことで設定が反映されます。

プロンプト調整画面の内容
生成枚数は1, 4, 8, 12枚の選択肢から選ぶ形式になります。
画像生成AIモデルのSDXL / SDV3.5で、詳細設定の内容が異なります。
画像スタイル:SDXLのみ
画像サイズ:選択肢が異なります

①プロンプト
- プロンプトを入力してください。最初の方に入力された情報を優先的に生成します。
- [自動翻訳]をONにした場合、日本語でも生成する事ができます。
②ネガティブプロンプト
- 画像内に含めたくないものを入力してください。
- 入力は任意です。なくても問題なく生成できます。
③自動翻訳
- デフォルトでONになっています。プロンプトに日本語を入力する場合はONにしてください。
- 詳細はこちらを参照してください。
④生成枚数
- 最少枚数は1枚で最多枚数は12枚です。
- デフォルトでは4枚になっていますが、枚数が多いほど生成にかかる時間が長くなります。
⑤公開範囲
- チーム / プライベートの公開範囲を指定できます。
- 生成を開始した後に公開範囲を変更する事はできなくなります。
- 履歴から編集することで公開範囲を変更することは可能です。
- 履歴から、自分自身で行ったAIデザインのページに飛ぶ事で、画像生成を再開する事ができます。
使い方(生成後)
生成画面
生成画面では、新しく生成したものが上に来るようになっています。

①プロンプトを調整(最新):最新のプロンプト調整画面が開き、プロンプトや画像比率などを調整します。
②プロンプトを調整(履歴):指定した履歴の段のプロンプト調整画面が開き、プロンプトや画像比率などを調整します。
③リトライ:同じ設定を使ってもう一度生成し直します。
④全てダウンロード:その段で生成した全ての画像をZipにしてダウンロードします。
履歴画面
生成した画像をクリックすると、履歴画面が開きます。
使用した設定の確認や画像の個別ダウンロードを行う事ができます。

①履歴サムネイル:生成した段以外にも、その画面で行った全ての生成画像のサムネイルが表示されます。クリックする事で履歴画面内で遡って確認する事ができます。
②画像を修正:[画像を修正]する機能に移動します。
使い方(お気に入り機能)
自分が生成した画像だけではなく、メンバーの画像についてもお気に入り登録ができます。

②☆マークをクリックして、お気に入りに保存できます。


注意事項:
生成した画像は1か月後に消去されるので必要に応じて適宜ダウンロードして下さい。

AIデザインの各モデルの比較
update 13 Feb 2026
概要
ここではAIデザインのモデルの切り替えと精度の比較をご案内します。
使い方
(1)モデルの切り替え方法
- [アカウント設定]から[画像生成モデル]の切り替えができます。

(2)AIデザインモデルの概要
SDXL(Stable Diffusion SDXL 1.0)
- クレジット消費量が少ないモデル
- 画像スタイルを使うことができる
- 生成速度が速い
V3.5(Stable Diffusion 3.5Large)
- クレジット消費量 標準
- プロンプトの対応力が高い
- クオリティが高い
- 生成後、一部修正ができる
- 自分の画像をアップロードできる
Flux -Lora
- クレジット消費量 標準
- プロンプトの対応力が高い
- 細部までクオリティが高い
- ファインチューニング可能(別途申込)
Try-On
- クレジット消費量 多い
- プロンプト入力なし
- モデル画像と衣装画像を用意する必要あり
- AI試着に特化したモデル
Seedream(4.0/4.5)
- クレジット消費量 (4.0標準 / 4.5多い)
- プロンプトの対応力が高い
- 4K出力可能、その場合細部までクオリティが高い
- 4.0
- 4.5
- 生成後、プロンプトで修正ができる
- 自分の画像をアップロードできる(10枚まで)
▼Seedream画像生成の詳細はこちら
https://maisonai.io/blogs/guidebook/seedream-imagegereration
| モデル名 | クレジット消費 | プロンプト対応力 | 生成後の一部修正 | 生成後の全体修正 | 画像のアップロード |
|---|---|---|---|---|---|
| SDXL | 少ない | 標準 | 不可 | 可能(度合調整可能) | 不可 |
| V3.5 | 標準 | 高い | 塗りつぶしとプロンプトで修正 | 可能(度合調整可能) | 可能 |
| Flux-Lora | 標準 | 高い | 塗りつぶしとプロンプトで修正 | 可能 | 不可 |
| Try-On | 多い | - | 不可(試着特化) | 不可(試着特化) | 必須(商品・人物画像) |
| Seedream 4.0 | 標準 | 高い | プロンプトで修正 | 可能 | 10枚まで可能 |
| Seedream 4.5 | 標準 | 極めて高い | プロンプトで修正 | 可能 | 10枚まで可能 |
モデル比較
(1)プロンプトの反映精度の向上
入力した文章がより正確に画像に反映されるようになりました。特に、画像内の人数や人物の服装に関する細かい指示が、従来のモデルよりも正確に再現されるようになります。
比較したプロンプト:(ライブラリにて提供中)
[画像全体:女性モデルにフォーカスした全身画像、動きとドラマを強調したスタイル、シンプルで力強いファッション]
[ジャケット:インディゴブルー、デニム素材、ユニークなデザイン、膨らみのある袖、ウエストに広がるフレア]
[スカート:インディゴブルー、ひざ上の長さの丈、デニム素材、現代的、柔らかい印象]
[髪型:ミディアムボブ、ウェーブ、エレガント]
[背景:暗い、シンプル、ドラマチック]

着せ付け:Try -On
試着特化型のAIデザインモデルです。着用させたいモデル画像と、着用させたい衣装の画像の2枚をアップロードするだけで、試着したような画像を生成することができるモデルです。プロンプトは入力しません。
生成結果
使い方はこちらから 着せ付け:Try -On
Flux-Lora
「Flux-Lora」とは
「Flux-Lora」は、繊細な質感や構図のバランス、細部の描写精度に優れたビジュアルを生成できる画像生成AIモデルです。
特に、人物の手や顔といった複雑な要素や、ファッションアイテム・素材感の再現性において安定性が高く、表情やディテールにこだわったビジュアル作成に最適です。
さらに、プロンプトの解釈精度も高く、自然な文章からでも意図に沿ったアウトプットを得やすいため、デザインの初期案出しから提案資料向けの高品質素材生成まで、幅広い用途に活用できます。
▼同じプロンプトで生成した結果の比較

AIデザインファインチューニング機能搭載
お客様がお持ちの特定の画像データを追加トレーニングデータとしてファインチューニングを行い、プロンプト(テキストでの指示)だけでは表現しきれない、独自のスタイルやブランドイメージを反映した画像を生成できるようにする機能です。
Maison AIでは、このプロセスを「AIデザインファインチューニング」としています。
こちらは別途、導入のお申し込みが必要となります。
活用例:Maison AI サンプルファッションブランド「PRISMO」の場合
例えば、「PRISMO」というファッションブランドでこの機能を利用する場合、以下のようなステップで独自のブランドイメージに合った画像を生成できます。
1.教師データの準備と学習
「PRISMO」ブランドのDNAとなる特徴的なデザイン、色使い、雰囲気を持つ画像を数十枚用意し、追加トレーニグデータとしてファインチューニングします。
※画像の選定・権利確認はクライアントが行い、ファインチューニングとデータセット登録はAuthenticAI が担当します。

2.「PRISMO追加トレーニングデータセット」を活用した画像生成
AuthenticAIがお預かりした画像でファインチューニングを行い、追加トレーニングデータの登録を行います。それにより、Maison AIのAIデザイン機能から「PRISMOトレーニングデータセット」を選択が可能になります。
Maison AIのAIデザイン機能から「PRISMOトレーニングデータセット」を選択し、通常のプロンプト(例:「春夏の新作ドレス、レザーのボックス型のバック」など)と組み合わせて生成します。
これによりファインチューニング済みのモデルでの画像生成が行われ、シンプルなプロンプトだけでも「PRISMO」ブランドらしい特徴を持った画像を効率的に生成することができます。
3.具体的な使用例
- デザインの検討に
- リアルなバリエーションを瞬時に展開できる
- そのブランドの新しい商品の開発検討に
- PR用の素材として
- PRとして利用できる教師データを使用していれば可能
実際に生成する時のイメージ

追加トレーニングデータなしでの生成結果の比較
追加トレーニングデータセットを使えば、言語化しにくい個性を素早く表現し生成可能

AuthenticAI サポート体制による導入
「どのような教師データを用意すれば良いかわからない」「特定のスタイルをうまく学習させたい」といったご要望にお応えするため、AIデザインファインチューニング機能はAuthenticAIの担当者がサポートを行い、導入させていただきます。
お客様が生成したい画像のスタイルについてヒアリングさせていただき、最適な教師データの準備から学習プロセスの支援まで、丁寧にサポートいたします。
お気軽にお問い合わせください。
お問い合わせはこちら:info@maisonai.io
ご利用方法
AIデザインモデル「Flux-Lora」への切り替え
1.アカウント設定の画像生成モデルから「高性能:Flux-Lora」を選択。

2.「AIデザイン」の詳細設定に「追加トレーニングデータセット」から「利用するデータセット」を選び、プロンプトを入力。


ご注意点
画像生成結果に、真っ黒な画像が含まれることがあります。これはプロンプトの一部を「NSFW(不適切)」と判断されてしまったことが考えられます。生成結果に黒い画像が多く含まれる場合は、プロンプトの指示の仕方を変更することで解消されることがあります。
※NSFWとは、”not safe for work”職場で不快感を持つような(暴力的/残酷/卑猥)な内容を含むコンテンツ等

着せ付け:Try-On
概要
[着せ付け:Try-On]とは
着せたいモデルの画像と、着せたい衣装の画像をアップロードし、AIで本当に試着かのような画像を生成するAI試着に特化した機能です。Fal.aiの『Try-On』を搭載しています。
ご用意いただくもの
着用させたいモデル画像と、着用させたい衣装の画像の2枚
使い方
簡単な4ステップで、すぐに試着画像を生成できます。

ステップ1:AIデザインモデルを選択する
- Maison AIにログインし、メニューから 「アカウント設定」を開きます。
- 画像生成モデルの中から [着せ付け: Try-On]を選択してください。
ステップ2:画像をアップロードする
- モデル画像のアップロード:ベースとなる、人物が写っている画像をアップロードします。(画像①)
- 衣装画像のアップロード:モデルに着せたい服の画像をアップロードします。(画像②)
ステップ3:オプションを設定する(任意)
よりイメージに近い画像を生成するために、以下の項目を設定できます。
- 着用タイプの選択:どの部分を着せ替えるか選びます。(画像③)
- 自動:自動で判断します。
- トップス:Tシャツやブラウスなど、上半身の服を着せ替えます。
- ボトムス:スカートやパンツなど、下半身の服を着せ替えます。
- ワンピース:ワンピースとして全体を着せ替えます。
- 衣装タイプの選択:アップロードした衣装画像の種類を選びます。(画像④)
- 自動:自動で判断します。
- モデル:他のモデルが着用している服の画像の場合に選択します。
- 平置きの服:床に置かれたりしている服の画像の場合に選択します。
ステップ4:画像を生成する
- 「画像を生成」ボタンをクリックすると、AIによる画像生成が始まります。
- 少し異なるバリエーションの画像が生成されましたので、お好みのものを選ぶことができます。
💡うまく生成するコツ
- 着せたい衣装のシルエットを崩したくない場合
- モデルが着ている服と、新しく着せたい衣装のシルエットが近いと、より衣装のイメージを引き継いだ結果が生成されやすくなります。
- 以下の事例では衣装画像のスカートのイメージを引き継がせたかったので、モデル画像のスカートを裾が広がったものに変更してから生成しました。(AIデザイン SD3.5Large使用)

- 髪型や靴は変わりません
- この機能は主に衣装を着せ替えるためのものです。モデルの髪型、表情、ポーズ、履いている靴などは、モデル画像から引き継がれ、変更されません。
- この機能は主に衣装を着せ替えるためのものです。モデルの髪型、表情、ポーズ、履いている靴などは、モデル画像から引き継がれ、変更されません。
- ライティングの雰囲気
- モデル画像と衣装画像の光の当たり方(ライティング)や影の雰囲気が近いと、合成後の画像のクオリティが向上しますが、AIがいくつかのバリエーションを生成してくれます。

「着せ付け:Try-On」を使えば、誰でも手軽にファッションのシミュレーションができます。撮影の手間やコストを削減できるだけでなく、これまで思いつかなかった新しいスタイリングを発見するきっかけにもなります。
ぜひ、お気に入りのモデルと衣装を組み合わせて、ファッションイメージを創造してみてください。
Image generation of the selected area
overview
Users can brush over parts of the generated AI image and regenerate only those areas, making it easy to fine-tune image details or modify specific areas.
You can also upload any image and have it generated by AI. For example, you can use AI to process photos you have taken yourself.
Please note that these features are only available in Stable Diffusion3.
How to use
① Model switching
- From [Account Settings], select [Model to use] > [Stable Diffusion3] and click [Change].

② [Edit selected area]
- When you hover the cursor over the generated image, a menu will appear, so click [Modify Selection].

- A popup will open. You can use the mouse to drag and paint over the area you want to correct.

- Enter the prompt you want to generate for the selected area. Clicking [Execute] will generate only the selected area.

③ Generate from uploaded image
- Click [① Generate from uploaded image] from the top panel.
- Click [②Select File] and select the image.
- After that, fill in the area and generate it in the same way as before.

Tips
For more detailed tips on how to use it, please see the page below.
Link: Image generation of the selected area Prompt tips
Use Cases
Design Changes
You can specify areas using product images taken by users or AI-generated images and make design changes to them.


Face Swap
By looking at images of people wearing the product, you can compare different races, age groups, and atmospheres.
*Faces generated from multiple images will not be of the same person.

Change your outfit
You can try out various outfits by looking at images of the product being worn .

Change background
By specifying only the background part, you can try out various situations.

AI-designed automatic translation
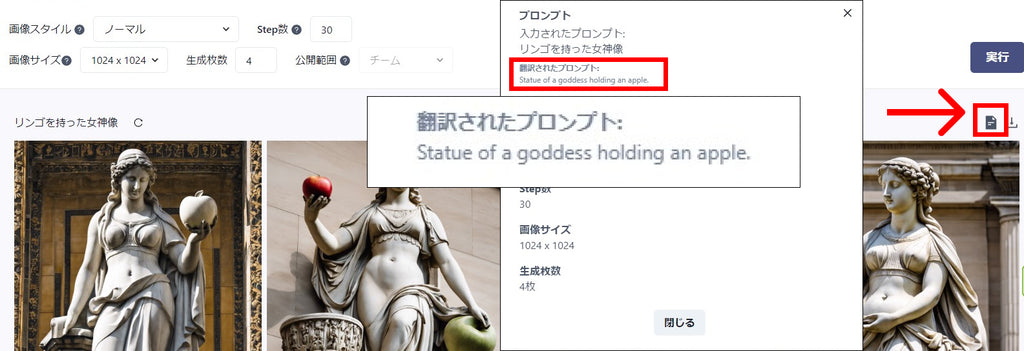
overview
By turning on "Auto-translate", you can automatically translate image generation prompts from multiple languages into English.
How to use
- "AI Design" has automatic translation turned on by default. It is possible to generate it in Japanese as is.
- Please turn this off if you want to prevent unintended changes caused by machine translation.

- After generation, you can also check how the prompt has been translated into English in the "Prompt Details" section.
- Try putting in a variety of words.

- One thing to note is that if you use hiragana, it may be automatically translated into unintended English words.

- In this case, the desired image is generated by converting "hito de" to "hito de".

- It also supports input of Chinese (Traditional), Korean, and other languages.

About image styles


About image size
For details on each image size, please see below.
| kinds | shape | Applications |
| 1024×1024 | square | Social media images, icons, app thumbnails, etc. |
| 1152×896 | Landscape Ratio | Website banners, blog images, etc. |
| 1216×832 | Landscape ratio | Presentation slides, website headers, advertising images, etc. |
| 1344×768 | Landscape ratio | Desktop wallpapers, website background images, advertising banners, etc. |
| 1536×640 | Landscape ratio | Website headers, horizontal ads, etc. |
| 640×1356 | Portrait ratio | Smartphone wallpapers, social media story images, etc. |
| 768×1344 | Portrait ratio | Digital magazine, e-book pages, vertical banners, etc. |
| 832×1216 | Portrait ratio | Portrait photos, magazine pages, e-newsletters, etc. |
| 896×1152 | Portrait ratio | Poster, flyer, menu design etc. |